How To Make Telegram Music Voice Chat Bot On zeet.co

REPO Voice Chat: https://github.com/rojserbest/VoiceChatPyroBot (Credit)

REPO: https://github.com/rojserbest/vcpb-zeet-deploy

Remote Desktop (Android): https://play.google.com/store/apps/details?id=com.microsoft.rdc.android

Deploying

Sign in with your Github account and fork this repo.

  • Go here Zeet
  • Sign into Zeet with your Github account
  • Now Choose New Project and choose GitHub repo and give access to your fork ,then click on Deploy Now.
  • Now Zeet will automatically starts building from the Dockerfile. Wait for the build to finish.
  • After completing the build you have to configure the Environment Variables.

Configuring

  • You will need to set the following Environment Variables for your VoiceChatPyroBot

API_ID :Get your api id from my.telegram.org

API_HASH :Get your api hash from my.telegram.org

TOKEN :Get your bot token from @BotFather

SUDO_USERS : A list of user ids which can pause, skip and change volume, Enter each id's seperated by a space.

GROUP  : The id of the group where your bot plays.

MONGO_DB_URI : your MongoDB URI (you can get one for free in their official website, sign up, create a cluster and a database named "vcpb")

USERS_MUST_JOIN : If true, only users which are in the group can use the bot.

LANG : your bot language, choose an available language code in VoiceChatPyroBot

DUR_LIMIT: Max video duration in minutes for downloads

⚠️ The Following variables are Compulsory (Others will use default values if not set)

API_ID
API_HASH
TOKEN
SUDO_USERS
GROUP  (If USERS_MUST_JOIN is set to True)
  • If the remaining values are not set then the Default values are:
 MONGO_DB_URI = None
 USERS_MUST_JOIN = False
 LANG = en (english)
 DUR_LIMIT = 10
  • After setting the Evnironment Variables save them and Wait for the Deploy to finish.

  • Once Deploying is finished check if your bot is working. If not make sure that you set the Environment variables Correct.

  • Once all are perfect now its time to setup XRDP to strat RDP connection.

  • Go to Your Zeet dashboard and select the deployed app and start the Zeet Terminal.

  • Start xrdp by running the bash script xrdp-start.sh by running /xrdp-start.sh

  • Once its started succesfully close the terminal and copy the PUBLIC IPS from Zeet Dashboard

  • Open a remote desktop client and login to your user. The default credentials are:-

  •             ls
                /xrdp-start.sh

    Username :vcpb 
    Password :music
  • If you want to edit the username and password , you can do it by editing the values in createusers.txt file. the foremat is username:password:is SUDO or not(Y/N)

    • ℹ️ If you are changing the default user , you may need to change the same in script.sh also .
  • Once after loging in , you can see a file named Telegram in /home/vcpb/Telegram Directory (You may see some error messages, Since many mate utils are not preset , ignore(delete) those.)

  • Execute it and login into your telegram account and Join a Voicechat.

    • ℹ️ No need to change the default microphone as MySink is already default Mic.

Bot Commands

Inorder to command the bot send one of the mentioned commands below with a / prefix

start - start the bot

song - check the playing song

volume - check the current volume

queue - check songs in the queue

pause - pause the playing song (sudo users only)

resume - resume the paused song (sudo users only)

play - same as resume (sudo users only)

skip - skip the playing song (sudo users only)

stream - stream a radio (sudo users only)

cleardownloads - delete all downloads (sudo users only)

playlist - see the items in the playlist (sudo users only)

clear_playlist - clear the items in the playlist (sudo users only)

play_playlist - play the items in the playlist (sudo users only)

How To Host Telegram Bot on Scaleway

1. Lets create a Scaleway Account first!

Link: https://console.scaleway.com/register

Enter required details and signup with Scaleway !

Card verification is required for signup! You'll be charged some amount for verification and the same will be refunded within few hours. So don't worry. 

2. Making an instance in Scaleway

Choose appropriate plan!

Creating a SSH key
Download PuTTY: https://www.chiark.greenend.org.uk/~sgtatham/putty/latest.html

*Create a new SSH Public key and copy paste it in Instance config page.
*Save it as our Private key.
*Create instance.

3. Connecting to the instance!

- Connecting to instance with our SSH key

        hostname : root@ipaddress

- You'll be logged in as a root user!

- Create a new user with sudo privileges ( cause it's better that way)

        sudo adduser  <newusername>

        sudo usermod -aG  sudo  <newusername>

        su - <newusername>

- Now whenever you login to your instance, change to your user by;

        su - <newusername>

Some required commands,

         sudo apt update && sudo apt upgrade


NOTE : Use Enter key to run your commands. Use right click to paste your copied command into terminal.

4. Setting up your repository

Configure Marie Bot Repo;

Clone the source code of Marie

Source code : https://github.com/prgofficial/Marie-2.0-English

Create config.py file from sample_config.py

#Bot Token: from Bot Father
#Owner ID: from Rose ( /id )
#Owner username: Any name
#Database URL: Install Postgres server in our Instance and get

5. Install and setup a Postgres Server

Connect to your instance, then run;
         sudo apt-get update
         sudo apt-get install postgresql postgresql-contrib

Give sudo permission to user
         sudo usermod -aG sudo postgres

Set a new password
         sudo passwd postgres
Password will be invisible, don't worry!

Login to Postgres
         su - postgres

Create new user for psql
         createuser --interactive --pwprompt

# enter a name for user
# enter a password for user
# give superuser power


You can give any name and password!!

Create a database and assign user
        createdb -O <username> <newdbname>
;

Allow remote access
         nano /etc/postgresql/12/main/postgresql.conf

Uncomment, and change the value;

#listen_addresses = 'localhost'
to
listen_addresses = '*'


This will allow Postgres connections from anyone.
USE ctrl + o and press enter to save the file and ctrl + x to exit the editor


Allow Connections from everyone 
         nano /etc/postgresql/12/main/pg_hba.conf

Modify this section;

# IPv4 local connections:

host all all 127.0.0.1/32 md5

to;

# IPv4 local connections:

host all all 0.0.0.0/0 md5

this will allow anyone to connect to your db using the username and password!
USE ctrl + o and press enter to save the file and ctrl + x to exit the editor

Allow port 5432
         sudo ufw allow 5432/tcp

Restart postgres to apply changes
         sudo systemctl restart postgresql

Now, your DB Uri will be;
        postgres://username:pw@hostname:port/dbname

6. Hosting Marie repo

Connect to your instance using putty

connect again using putty or;

press ctrl + a + d to go back to your user from our current screen

Using screens is a better way to run your programs.
        screen -S marie

This will open a new screen inside our main terminal.

Clone your source code to your instance

        git clone <your_repo_url>

Enter your Github username and password and hit enter!

Change your current directory

        cd <reponame>

Install required dependencies.
        sudo apt install python3-pip
        pip3 install -r requirements.txt

Start your BOT !
        python3 -m tg_bot

Your BOT is ready to use :)
now your bot is ready with nearly unlimited filters....
:) thank you

Some Usefull commands;

> To detach from current screen
Ctrl + a + d ( hold Ctrl and press a and d sequentially )

> To see all active screens
screen -ls

> To attach to a screen
screen -r number

>To detach from a screen
screen -d number

>To logout from terminal with BOT running in screen
Ctrl + a + d

Credit: @PrGofficial
Documented by: @PrGofficial

How To Host Telegram Bot on Digital Ocean


How to host telegram Marie bot on Digital Ocean with Unlimited Filters by hosting a Postgres server ourselves

* No Dyno Issus 
* Unlimited Filter 
* Better Speed 
* Less response time 
Your BOT will be up and running as long as you pay for VPS 😋

1. Lets create a Digital Ocean Account first!

Digital Ocean: https://cloud.digitalocean.com/registrations/new

Enter required details and signup with Digital Ocean!

Card verification is required for signup! You'll be charged some amount for verification and the same will be refunded within few hours. So don't worry. 

To avail digital ocean 100$ free credits promo offer, register and sign in through this link : https://m.do.co/c/aa2ff0eeaa5e

2. Making an instance in Digital Ocean

Creating a SSH key

Download PuTTY ; https://www.chiark.greenend.org.uk/~sgtatham/putty/latest.html

Create a new SSH Public key and copy paste it in Instance config page.

Save it as our Private key.

Deploy instance.

3. Connecting to the instance!

- Connecting to instance with our ssh key

        hostname : root@IPV4address

- You'll be logged in as a root user!

- Create a new user with sudo privileges ( cause it's better that way)

        sudo adduser <newusername>

Enter a new username and password (typed password will be invisible) and press enter for all other values to leave it to default

        sudo usermod -aG sudo <newusername>

        su - newusername

- Now whenever you login to your instance, change to your user by;

        su - newusername

4. Setting up your repository

Configure Marie Bot Repo;

Clone the source code of Marie

Source Code : https://github.com/prgofficial/Marie-2.0-English

Create config.py file from sample_config.py

        Bot Token : from Bot Father

       Owner ID : from Rose ( /id )

        Owner username : Any name

Database Uri : Install postgres server in our Instance and get

5. Install and setup a Postgres Server

Connect to your instance, then run;

        sudo apt-get update

        sudo apt-get install postgresql postgresql-contrib

Give sudo permission to user

        sudo usermod -aG sudo postgres

Set a new password

        sudo passwd postgres

password will be invisible, dont worry!

Login to postgres

        su - postgres

Create new user for psql

        createuser --interactive --pwprompt

        # enter a name for user

        # enter a password for user

        # give superuser power

you can give any name and password!!


Create a database and assign user

        createdb -O <username> <newdbname>

Allow remote access

        nano /etc/postgresql/12/main/postgresql.conf

Uncomment, and change the value 

        #listen_addresses = 'localhost' 
To 
         listen_addresses = '*'

this will allow Postgres connections from anyone.

USE CTRL + O and press enter to save the file and CTRL + X to exit the editor


Allow Connections from everyone

        nano /etc/postgresql/12/main/pg_hba.conf

Modify this section;

        # IPv4 local connections:

        host all all 127.0.0.1/32 md5
TO;
        # IPv4 local connections: 
        host all all 0.0.0.0/0 md5

this will allow anyone to connect to your DB using the username and password!

USE CTRL + O and press enter to save the file and CTRL + X to exit the editor 


Allow port 5432

            sudo ufw allow 5432/tcp

Restart postgres to apply changes

        sudo systemctl restart postgresql

Now, your DB URL will be;

        postgres://username:pw@hostname:port/dbname

6. Hosting Marie REPO

Connect to your instance using putty

connect again using putty or;

Press CTRL + A + D to go back to your user from our current screen


Using screens is a better way to run your programs.

        screen -S marie

This will open a new screen inside our main terminal.


Clone your source code to your instance

        git clone your_repo_url

Enter your github username and password and hit enter!

Change your current dirrectory

        cd reponame

Install required dependencies.

        sudo apt install python3-pip

        pip3 install -r requirements.txt

Start your BOT !

        python3 -m tg_bot


Your BOT is ready to use :)

Now your bot is ready with nearly Unlimited Filters....


:) thank you


Some Usefull commands;

> To detach from current screen
Ctrl + a + d ( hold Ctrl and press a and d sequentially )

> To see all active screens
screen -ls

> To attach to a screen
screen -r number

>To detach from a screen
screen -d number

>To logout from terminal with BOT running in screen
Ctrl + a + d

Credit: @PrGofficial
Documented by: @PrGofficial

Telegram Announced Paid Memberships And Channel Monetization

Over the years, Telegram has proven to be a popular alternative to WhatsApp and Facebook Messenger. It's now on the verge of reaching 500 million active users, and as it approaches this milestone, co-founder Pavel Durov has announced plans to start earning revenue in 2021 through premium features and an ad platform.

An operation of such scale requires some serious moolah to keep going, and the app is regularly updated with new features — just today, always-on voice chats, SD card support, and new animations were introduced. Durov's savings were the primary source of funding until now, but this isn't sustainable in the longer term. To keep the boat afloat, Telegram has a two-pronged strategy.

Firstly of all, it plans to introduce paid features in 2021 that will be aimed at business and power users. Don't worry, all of the features that are currently free will remain so, forever.

Secondly, and probably more importantly, it plans to introduce an ad platform that is user-friendly, respects privacy, and allows them to make up for the costs of servers and traffic. It's important to note that no ads will be displayed in either personal or group chats. What may be monetized are the public one-to-many channels, some of which have millions of subscribers.

The company claims that if it starts earning revenue, it will share benefits with the community. For instance, channel owners will "receive free traffic in proportion to their size," although it's not exactly clear what that means, and there will be other opportunities such as paid stickers with profits going to the artists.

Thankfully, Durov dismissed the idea of ever selling Telegram to a large corporation, snarkily pointing out Facebook's acquisition of WhatsApp in the process. According to him, the route that the company has chosen will allow it to keep innovating and growing without losing focus on its values.

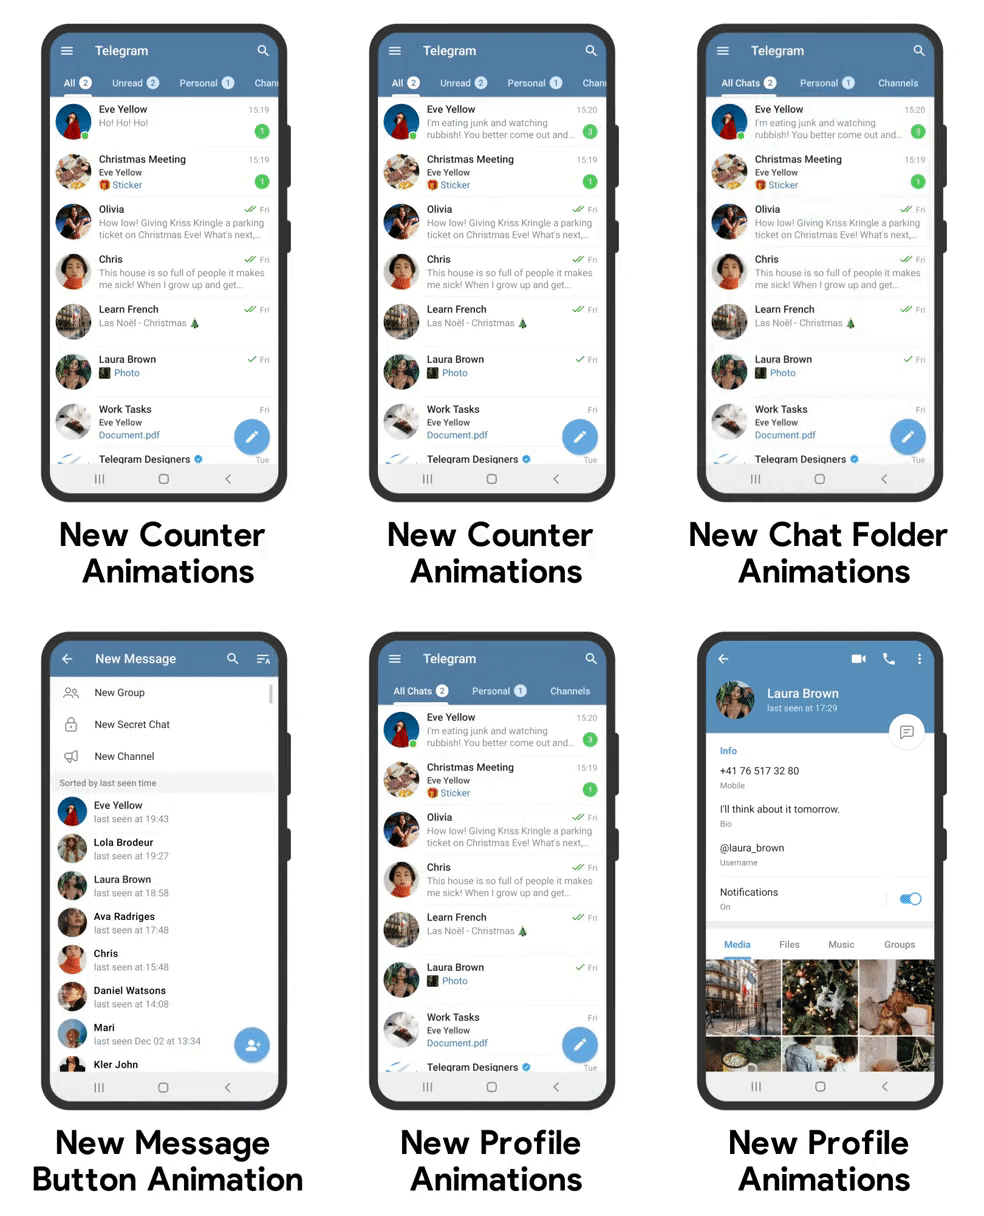
Telegram adds always on voice chats, SD card support, and new animations

As the year draws to a close, Telegram is pushing out a new update that adds to what is already one of the most feature-rich messaging apps. The most interesting addition is Voice Chats, which allows users in a group chat to participate in an always-on conference call, coming and going as they please.

Once activated (by an admin), group chats will have a special bar at the top that shows how many members are currently involved in the voice chat. Android users can further this experience by enabling a system-wide floating widget. Notably, the feature can support up to a "few thousand participants," but I'm having trouble imagining how that could go well.

Voice Chats will also be available on iOS, Windows, and macOS. On desktop, you'll be able to assign a push-to-talk key to send messages even when Telegram is not focused. The new update brings a few other improvements too. Something you'll immediately notice is the new animations that are littered throughout the Android app. And yes, you can finally move your data from internal storage to an SD card.

Telegram's media editing tools on Android and iOS are now on par with one another. You can now add effects, drawings, or stickers to an already-sent photo on Android, while Apple users gain the the ability to quickly edit and send back photos. Finally, the update brings more animated emojis and will also show outlines of stickers before they load, making it a tad quicker to select an appropriate one.

How To Make Own Telegram YouTube Video Downloading Bot

If u downlaod videos very frequently.. google will block your ip. It's Safe for personal use ... But for large audience keep proper time gap on next request / downlaod


Youtube Dl bot ðŸ˜‰

Prerequisite

ffmpeg

install dependencies

pip3 install -r requirements.txt

Setup Bot

- Change configuration config.py  File
- install dependencies
- python3 -m bot

Group calls appeared in Telegram!

The Beta version of Telegram for Android introduces group audio calls. The group call can be started by an administrator with special permission for this.

There are two options for group calls:
- Everyone can talk.
- Only admins can speak.

DON'T MISS

beta, news, bot, features, bot, tutorial, Userbot, telegram
© All Rights Reserved
Made With By InFoTel